Nursing Cover for Breastfeeding: Flexible & Fabulous

Nursing cover - old style

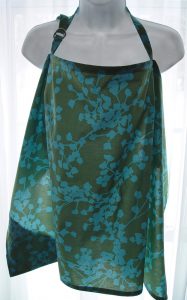
Type of nursing cover I used. Not the most stylish, but it was all I had! (Photo credit: Kristen Valenti on Flickr)

(This post contains affiliate links. This means if you choose to click the link and purchase an item, I will receive a commission on your purchase. The views and opinions expressed in this post are my own, and are not influenced by my affiliate status.)


Breastfeeding Moms Need Better Covers


My breastfeeding days are over, but if I was still in that stage, I would love this fabulous nursing cover. I remember the awkward cover I had, the kind with a strap you put around your neck and slipped through a buckle ring. It kind of looked like a giant-sized bib or apron. Not the most stylish thing I’ve ever worn.

I always found myself struggling with it. Swinging it around to get it in the right position while juggling my squirming baby. Then it would slip or slide, get pushed aside by my kid (who did NOT like to be under anything), or otherwise fail to provide the right kind of discreet cover. It was hot, and it just never worked for me, so I ended up figuring out how to use my hoodie sweatshirt to serve as a makeshift nursing cover. Or, ~ gasp ~ I would simply go UNcovered because I just couldn’t bring myself to wrestle with the “slip ‘n slide,” and I was beyond caring.


A Nursing Cover You’ll Love


Enter the multi-use nursing cover! My niece’s friend introduced her to these fabulous and versatile beauties when she came to visit her with a new baby. She sent me the link, I looked and was immediately in envy. I wish I had one of these when I was breastfeeding. If I had, I would probably still be using it today, given its versatility as a nursing cover AND a stylish fashion accessory.

Versatile nursing cover

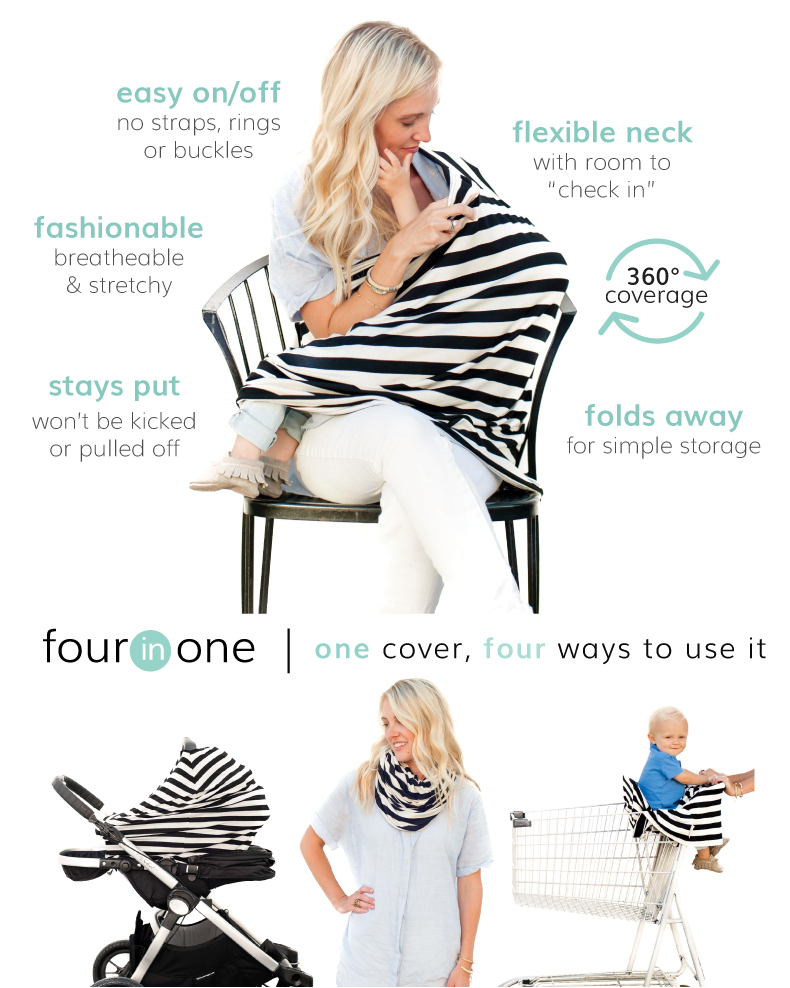
Fabulous Nursing Cover by Covered Goods (Photo credit: Covered Goods, used with permission)


I’m all for buying items that can be used in multiple ways. I mean, don’t we all love a good value? This baby is the Swiss Army Knife of nursing covers. Obviously, you can use it to cover up your little one while they happily latch on to eat. But you can also wear it as a scarf, use it as a car seat cover, line your shopping cart with it to protect your baby from germs and cold metal & plastic. I probably would have also used it as a light blanket for the baby in the car or stroller. Really, the possibilities are endless.

The light, stretchy material also allows you to peek if you need to check on things while breastfeeding. Or, if your baby is a squirmer like mine was, for the baby to peek and check on mom! But with all the peeking, you won’t find yourself giving anyone a peep show since this cover goes all the way around. No flashing your neighbor the next time you’re nursing!

I really think this is one of the coolest nursing covers I’ve ever seen, and one that is truly functional, attractive and useful. If you’re a breastfeeding mom, I highly recommend that you check these out. You can find them online at Covered Goods. If you’re not a breastfeeding mom, but you have friends or family members who are or might be, these would make fantastic, affordable gifts! Show up to your next baby shower with one of these, and you’re guaranteed to be the hit of the party. Based on everything I’ve seen, these nursing covers are definitely going on my list of “must haves” for all the breastfeeding moms I know.

What do you think of these?  Were you (or are you) a breastfeeding mom? If so, how did you stay discreet?


Read More

The Best Teacher Appreciation Gift Ever

Teacher appreciation note

A Simple Thank You for Teacher Appreciation (photo by Elena Roussakis on Flickr)


Showing a teacher appreciation is such a simple thing to do. Yet we often take for granted these champions of our children. This week, in chatting with different friends at different times, I’ve been astounded that so many have been experiencing challenging issues at their schools. With both teacher and parent perspectives represented, I can honestly say how fortunate I feel to NOT be smack in the middle of what they’re respectively going through.

Not to say that I don’t want to hear their struggles. They’re my friends and I’m here for them. I’m here to listen and support and empathize and provide feedback when and where that’s appropriate. But it’s made me think.


Teacher Appreciation Any Time, All the Time


Teachers need to know we appreciate them. They spend their days caring for our children, nurturing their imaginations, challenging their minds. They teach them numbers and letters and how to put them together into words and sentences and stories and equations. They help our kids learn to share and cooperate and solve problems together.

They spend nine months helping our kids gain the skills and knowledge they need to continue growing, to move on to the next grade, to effectively master what they need to know at this stage in their lives. I don’t know how they do it and I know I’m not alone.

We give them teacher appreciation gifts at the end of the year to say thank you. A gift card from the class or a new coffee mug or some plaque with an apple on it. But do we really say thank you? If you have a teacher, or teachers, in your life who have made a difference to you and/or your kids, I think any time is the time to tell them. Let’s start now.


Here’s What I Propose


Get out some paper or get on your computer – wait, you’re already here! – and write a thank you note to a teacher. Bonus points if you write to more than one. Tell them what  you appreciate about them. Tell them about the difference they have made in your life. Even if it’s just to pinpoint one time you noticed an extra kindness or that single moment when your kid finally “got it.” Trust me, they don’t hear this often enough.

You don’t have to get fancy; a simple email or Facebook message will do the trick. Or pop a hand-written note in the mail. If you don’t know where to find them or you’re unsure about contacting them directly, try sending a note to your school principal or parent-teacher group to let them know about a special teacher in their midst. Oftentimes, principals only hear the negative, when people are complaining. Give them a chance to see the positive and remember that teaching and being a part of the education system has rewards, too. Who doesn’t love unsolicited praise?

Give the good ones a reason to want to come back year after year and make a difference for the next group of kids. Give your principal a nice note to tuck into a teacher’s file for the next time they get discouraged. Be part of your parent-teacher group’s efforts to support great teachers. And show your kids how important it is to say thank you. I know you’re busy, but in then end, everyone will benefit from you taking a few minutes to write a note.

If you simply can’t make the time to write a letter, send them the link to this story from Scary Mommy. It’s beautifully written and sends a sincere message. But make it from you. Tell them it reminds you of them.


Just Do It


For many of us, I realize the school year has already come to an end. But, really, is there ever a bad time to say thank you? It’s so easy to think of teacher appreciation as the group gift that you hope someone else will coordinate, the token, and sometimes impersonal, note signed by 30 families. I’m sure the teachers appreciate these gestures because acknowledgement in any form always feels good. But think of how much better it would be to get a message of appreciation, out of the blue, when you’re not expecting it. I think it would make their day.

I’m off to write some thank you notes to some awesome teachers. I hope you’ll do the same!


Read More

A Father’s Day Gift He’ll Love (You Will, too!)

Father's Day tree


Father’s Day is June 19 (I looked it up!)

June has arrived, which means Father’s Day is just around the corner. If your guy is anything like my husband, he’s got pretty much everything he needs, so what can you give him that he’ll love and won’t break the bank? This fabulous family tree!


Father’s Day DIY Made Easy

Sometimes making a gift can feel like a daunting task, but with a little bit of planning and some help from the kids, you can create a personalized keepsake that any dad will love. Actually, I love this one so much that I would have made it for myself if it hadn’t been Father’s Day!

I can’t remember where I saw this idea first (it was before I really got familiar with Pinterest), but I loved the idea so I got to work making it happen.

First, I gathered some supplies:

  • White poster board, 11 x 17 (I bought a big one and cut it to size)
  • A simple frame to fit
  • Ink pads in various colors (I bought a set and have used them for multiple other crafts since then. If you have some already, just use these!)
  • Pencil, a good eraser and a brown permanent marker (all things I had on hand)

Next, I sketched out the tree in pencil on the poster board.

This took a while because I was being picky about how the branches looked, but you can make it however you like. I just saw a simple version of this on Naptime Decorator, and it looks super cute and easier than the one I drew.

Once I had the sketch the way I liked it, I colored it in with a brown permanent marker. I love the way the marker made the branches and tree trunk look like real wood. I chose to leave a little space in the trunk to add a “carving” like carving our message in a real tree, but you could certainly make it a solid trunk.

I also hand-lettered Happy Father’s Day at the bottom, but you could leave that off or include a different message or put a cool saying on your finished product. I love the saying Liz at Naptime Decorator (see above link) used! My hand lettering was super simple, but if you want to make it look more “designed,” take a look at this hand lettering tutorial from Morgan Manages Mommyhood. It’s a great primer on how to create great-looking text!


Personal and Meaningful Father’s Day

Once I had my part done, I grabbed the kids and had them do their part. I used the stamp pads to put color on their hands – make sure there’s plenty of color on them – then placed their handprints on the tree. Our oldest got the lowest branches, then I worked up to our little one at the top. They were 10, 7 and 2 at the time, so their hands fit perfectly on this size tree. If you have fewer/more kids or they’re bigger or smaller, just use your judgment on how you want it to look. For an only child, you could include your handprints, or use their hands and intersperse the design with little fingerprint leaves.

Father's Day DIY supplies

Ink Pads for your Father’s Day Masterpiece


The great part is that the stamp pads dry really quickly, so you can even do this at the last minute. Once it’s dry, just pop it in the frame and wrap it up! My husband was so pleased when he opened it and realized what it was, and he hung it up right away.

This is one of my favorite DIY gifts I’ve ever made. Even though it cost less than $10 to make, it holds a special place in all of our hearts that no expensive, store bought gift could match. The kids like to hold their hands up to it to see how much they’ve grown over the years, and it serves as a happy memory of when they were little.

Father's Day Wall Art

The finished product


Stay tuned for another fabulous and easy Father’s Day project coming soon! In the meantime, what do you think of this family tree? Will you make one? Let me know if you have any questions!

Read More

Best Snack Ever: Brazilian Cheese Bread

Brazilian Cheese Bread

Who doesn’t love a good snack? And one that’s easy to make? With Brazilian Cheese Bread, you’ve got it all!

My sister introduced me to these luscious puffs of deliciousness, and they’ve become a favorite among family members and, more importantly, my kid’s playgroup. The kids always request this snack, and they gobble them up in a flash.


What’s So Great About Brazilian Cheese Bread?

I’m glad you asked! The best part about Brazilian Cheese Bread – or cheesy bread as the kids call it – is that it’s actually healthy and easy to make. All the ingredients get thrown together in the blender, whirred around until you have a smooth batter, then poured into mini muffin tins. That means you only have one appliance to clean – awesome!

Brazilian Cheese bread in muffin tin

Pour the batter into well-greased mini muffin tins

These little bites are also gluten free since they use tapioca flour rather than regular wheat-based flour. This makes them light and fluffy as well. You pick the cheese depending on what flavor you like. The kids love cheddar, so that’s what I usually stick to, but I’ve made them with gruyere, mozzarella & parmesan, and a Mexican cheese blend. They’re all fantastic.

The bread comes out a cute little puff that’s a little crispy on the outside with a rich, chewy center. The texture is both light and satisfying, cheesy and bread-y (is that a word? It is now!). They’re the perfect snack food. Just be careful, because it’s super easy to eat one after another after another until they’re gone. Oh, what the heck, go ahead – there’s nothing bad in them, so eat to your heart’s content!


Okay, What’s In It?

Cheese, olive oil, milk, egg, a little salt and tapioca flour. If you don’t have tapioca flour – also known as tapioca starch – in your pantry, no worries. It’s easy to find. Most grocery stores will have it in the same aisle with the regular flour. Just look for it with the other packages of “specialty” items like oat bran, almond flour, rice flour and the like. Bob’s Red Mill is a popular brand that most grocery chains carry now.

Brazilian Cheese bread ingredients

Tapioca Flour (starch) from the Chinese store along with the other ingredients

If you happen to have an Asian market nearby, go there for your tapioca flour. I usually buy several packages on my runs to the Chinese grocery store since I can score each package for around 89 cents.

If you’re dairy-free, I’m afraid I haven’t tried any substitutions with this recipe. This is one I follow to the letter with no alterations. Not because I don’t like to experiment, but because this recipe works. It’s just right. Every time. If you do try any substitutes, let me know. I’d love to hear how they work!


Are You Ready to Try These?

Okay, I won’t keep you waiting any longer. Here’s the recipe!

[amd-zlrecipe-recipe:4]

Let me know if you try this recipe. I’d love to know what you think!


Read More

Easy Teacher Gift: DIY Flower Garden

Quick and Easy Teacher Gift

Yikes – it’s the end of the school year! Have you become an “end of the year parent” like the ones here, here and here? Do you need a quick and easy teacher gift that you can do yourself in less than an hour and for very little money? If so, you came to the right place.

You’ve probably seen them in your doctor’s office or at any counter where you have to sign in (like the school front office). It’s those pots or jars full of flowers that are actually pens, and while it may not seem like the perfect gift, for anyone who’s had their pens stolen, or who likes to garden, or who would rather look at flowers than an ugly pen cup, these can be a godsend.

My daughter happens to have a teacher who loves to garden, and since this is her last year in her elementary school, we made a bigger year-end gift as a special thank you. We incorporated the pens into a full gardening set with a flower pot, seeds, gardening gloves and a cute garden stake. But if the pen set is all you need, it couldn’t be easier.

The Ultimate Easy Teacher Gift

All the items I used can be found at your local dollar store, so this project comes out on the cheap end of the gift spectrum as well.  If you don’t have a dollar store near you, look around your house before shopping. Grab some stray pens from the junk drawer, an empty jar from your cabinet, duct tape from the garage and have at it! Then, you can always head to Target, Wal-Mart or you local craft store to gather any additional supplies you need. You should be able to finish this project for $5 or less!

Supplies for easy teacher gift

Simple supplies from the dollar store

Here’s what to get:

  • Pens – pack of 10
  • Silk flowers – the more stems per bunch, the fewer bunches you’ll need
  • Tape – colored duct tape works great. I happened to have floral tape at home, so I used that instead of buying anything new
  • Container – a medium size jar, cup, flower pot, small bucket or whatever will hold the pens and look nice. If you have something at home, even better!
  • Glass beads, stones or something to put in the bottom of your container (optional) – we used glass beads because they look pretty, but as long as your pens will stand up, you don’t actually need anything.
  • Scissors or wire cutters

Here’s how you do it:

  • Remove the caps from the pens.
  • Cut the flowers from the bunch, leaving enough stem to reach almost to the bottom of the pen. Keeping the stem long will help you avoid having an unsightly bump along the length of the pen and make it easier to hold.
  • Tape the stem to the pen by wrapping it around and around from one end to the other. Make sure your ends are tightly stuck so they don’t unravel.
  • Continue wrapping flowers to the pens until you have enough to fill your container.
  • Put them in the container – sticking them in the stones or beads if you’re using them – and stand back and admire your work!
Easy Teacher Gift: Pot of Flowering Pens

You’re done!

Add Some Little Extras

As I said, for my daughter’s teacher, we added the pen cup to a complete garden set, but you can add some small touches to make the gift more personal without adding a lot of cost or effort.

For example, have your child write a note to accompany the gift. Teachers love hand-written notes, especially if they’re written from the heart. You could also put the teacher’s name on the container (or have your child do it), or decorate it with simple materials you probably have at home. Wrap a ribbon around the top, stick pom-poms on the container, paint a picture on it, and/or “name” your gift. Something like, “Ms. Nancy’s Pen Garden” would be cute. Be creative and involve your child in the process. They can clue you in to things like their teacher’s favorite color or animal, and they can help create the gift, themselves.

The whole process takes almost no time at all, and you can make this easy teacher gift in under an hour. And no one will know that you waited until the last minute.

Bonus: if you’re already too late to make this gift for your teacher(s) this year, file it away for next year. AND these make great summer projects, too. Make them for friends, grandparents or for yourself!

What other ideas do you have for an easy teacher gift? Share them below and spread the love!


Read More

Summer Reading: What You Must Know

Summer reading hammock

The perfect place for summer reading!


I can’t believe it’s the end of the school year! That means that summer is upon us and the potential for the “summer slide” is very real.

What is the “summer slide?” It’s the tendency for kids to lose some of the academic gains they’ve made over the school year. Did you know that some children can lose as much as 2 months worth of reading skills over the summer? And that loss is cumulative? That means that these learning losses build up summer after summer, so they fall farther and farther behind each year.

The good news … reading over the summer can stop the summer slide in its tracks.


Make Summer Reading FUN for Maximum Benefit


Reading experts agree that kids who think reading is fun get the most out of it. That means summer reading has to include more than just books. Reading and writing activities & games, story times with friends & family, and reading clubs & challenges are all ways to keep kids engaged.

Here are some key points to keep in mind when helping your kids, or other kids in your life, plan their summer reading strategies.

  • Access to books is critical to avoid the summer slide – look at the books you currently have at home and make sure they’re still interesting to your kids and they’re at the right reading level. In most communities, kids can get their own library cards, so they can check out books, too.
  • Reading research shows that when kids get to select what they read themselves, and want to read for enjoyment, they get the most benefit. This means they’ll increase their reading skills, including better comprehension, vocabulary and grammatical development, more than if someone else picks the material they read.
  • Kids read more when the adults in their lives encourage them to read, and when they see those adults reading as well.
  • Kids who think reading is FUN tend to read more, so make your summer reading choices with this in mind. Play games, incorporate activities and read anything and everything you can, even if it’s funny memes on the internet. You can find resources for online reading games with your kids’ favorite characters at PBS Kids. Or try Education World for links to games for all ages. Scholastic offers a variety of resources from activities & printables to book recommendations and games. Be creative and you’ll find tons of ways to make reading fun.
  • Summer reading programs that incorporate both choice and a social aspect help make things fun. See if your public library has a summer reading program, and/or take a peek at the Barnes & Noble or Scholastic summer reading programs. Most provide concrete ways to encourage kids to read and keep track of their reading, and they often get a free book if they complete the reading log or journal.
  • It doesn’t take much to keep kids on track! Reading just 4-6 books over the summer can help prevent a decline in reading skills.


Set a Summer Reading Goal & Get a Freebie


Setting a summer reading goal can be a great way to motivate kids to keep reading. And if that goal also has smaller objectives to reach along the way, as well as a reward for completing it, they will be more likely to follow it through to completion. With approximately 10 weeks to fill until school starts again, this is the perfect time to read, read, read!

I just did some goal setting with the 2nd graders I read with as a volunteer Reading Coach, and the kids really enjoyed coming up with a tangible goal, talking about what it would take to reach it and thinking of a way to celebrate once they achieve it. As struggling readers, it was so encouraging to see how enthusiastic they were about setting a summer reading goal and how easy it was for them to articulate it. True, they needed a little help thinking about what would be realistic and achievable, but beyond that, they did it themselves.

I’m going to do this with my kids, too, and hopefully they’ll all be happy to keep up with their summer reading!

If you want to do this with your children, I put together a simple Summer Reading printable to make it easy for you. Just sign up by filling out the simple form below, and you’ll have FREE access to this colorable goal sheet that will make your kid a Summer Reading Star.

For me, summer reading conjures up images of lazy days at the beach or being curled up on the porch swing with a book and a nice breeze blowing through my hair. Yes, those images are largely part of a fantasy world I often visit, but I credit this beautiful vision to all the books I’ve read in my life that nurtured my imagination. Come on! Join me on my imaginary beach as I read the summer away!


I hope this information and the FREEBIE will encourage you and your kids to keep reading all summer. What other tips do you have to encourage summer reading?

Sign up to receive my FREE Summer Reading Printable

* indicates required


Read More

Coming Soon: Blog Posts You’re Going to Love!

Coming soon - Lots of Blog Love

SO much love coming soon!

Do you ever feel like you have a lot to say, but you just can’t get it all out? That’s how I feel right now! Story ideas floating around in my brain, inspiration hitting me in the head, but I can’t seem to focus on any one thing long enough to put together a coherent post that will actually say something to you, dear readers.

I’m working on them, though. I’m also trying to learn what I need to know to offer you some useful freebies that will help make your life a little easier. Technology is so great, but there’s a lot to learn!

So I offer you this … a promise that I will have some great content ready for you coming soon – like later this week. But I don’t want you to leave empty-handed, so instead of my own words, here are some other great blogs I’ve been enjoying lately.

  1. One Missing Ingredient. If you haven’t stopped by my friend, Beth’s blog, you’re missing out. She’s snarky, witty and a great people watcher, which makes for great stories. And she offers a delicious recipe with each post, so you’ll never go hungry waiting for the next story. It’s like a reality show, but in blog form.
  2. Her View From Home. If you’re looking for thoughtful stories written by smart women, this site won’t disappoint. With everything from recipes to stories of love and struggle, each post is told from the heart and brings a deeper appreciation for the living life fully and valuing your own view from home.
  3. Ripped Jeans and Bifocals. As an older mom, I’m constantly on the lookout for other moms I can relate to, and Jill just gets it. She approaches motherhood with a sense of humor and unfiltered honesty. If seeing things through rose-colored lenses means staring through a glass of red wine, I’m there, even though my “glass of wine” is more likely to be a big cup of coffee.
  4. Wander and Wine. I just discovered this fabulous blog that is as beautiful as it is fun to read. Reading about adventures that are so different from my own is like taking a vacation in my own living room. Hana-Lee’s extensive knowledge of wine and the tips and travel stories she includes provide a glimpse into a lifestyle that a lot of moms can only dream about.
  5. Living for Naptime. I joined the Naptime Nation Facebook group about a month ago, and aside from being a group of like-minded bloggers who help each other and support each other, it’s a great resource for general blogging knowledge. Chrystie, our fearless leader, is a treasure trove of information, and her blog is a real treat. If you’re a blogger, you’ll learn so much from her. If you’re not, you’ll still love her site for parenting stories, insights into social media and more.

Remember, I’ll be back with more great content coming soon! Have a great week!

Read More